I Just Uploaded My Ssl to Bluehost. When Will It Show as Secure?
If y'all choose to create a new site from a template, yous'll have the choice to select i of the 23 pre-configured WPMU DEV templates, or i of your own custom Site Templates .
All of our available pre-configured templates are listed under the WPMU DEV Templates tab.
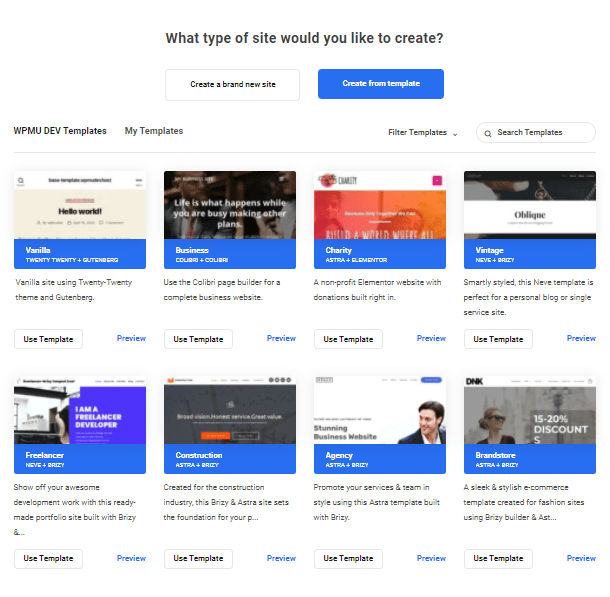
The WPMU DEV templates are built exclusively with popular free themes and plugins found in the WordPress repository, in improver to our Pro plugins. Defender , Smush , Hummingbird , Forminator , Beehive , and SmartCrawl are all enabled and the settings are optimized for the site. In that location'due south a default Forminator contact form on each template as well.
Pro Tip
If you would prefer to create sites without any of the WPMU DEV plugins installed (except of course the WPMU DEV Dashboard, which is required for all sites connected to your Hub), simply create your own custom template configured notwithstanding you lot similar, and use that one to create your new sites.
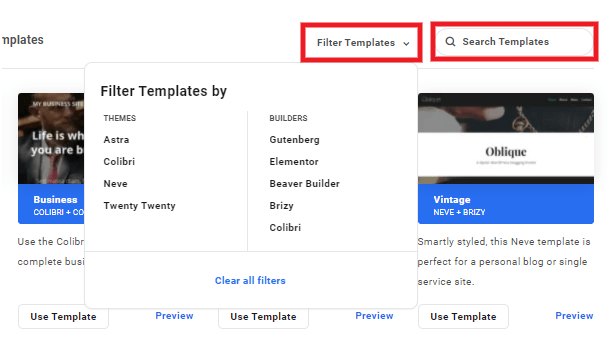
You tin can popular open a live preview of any WPMU DEV site template in a new tab by clicking the Preview link. Click the Utilize Template push button to select the template you desire for your new site. Search for a specific WPMU DEV template using the Search field, or brandish only those that interest you using the Filter pick.
Any custom templates you may have created are located nether the My Templates tab.
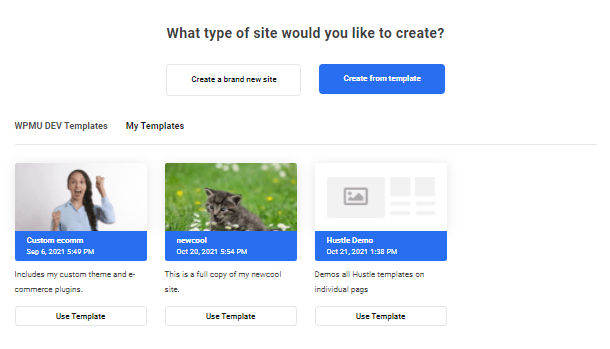
To create a new site from one of your custom templates, simply click the Apply template push. (You can't preview your custom templates though as they're really backups. See Custom Templates FAQ for details.)
Regardless of whether you select a WPMU DEV template or one of your custom templates, you'll first be prompted to select the hosting plan you want for the new site.
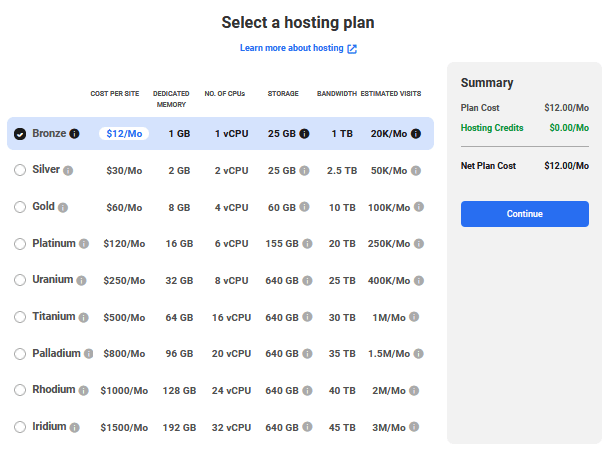
Note that if you simply signed up on a Hosting Only program , you would not see the programme table above unless you quit the onboarding procedure and come dorsum later, in which case the hosting plan y'all signed up on would exist locked in.
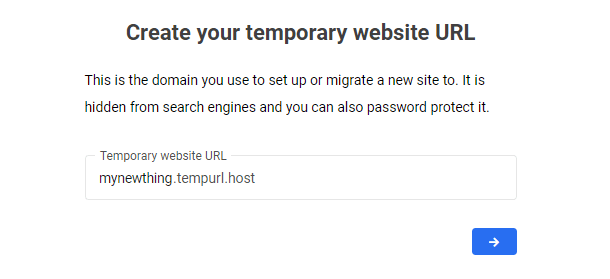
Side by side, enter the temporary URL you want to use for the new site.
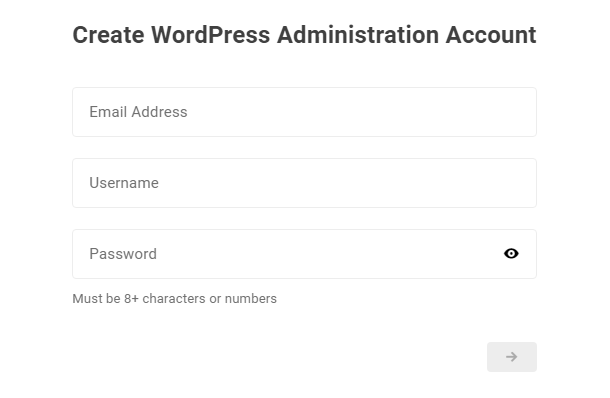
Then if you lot have selected to use a WPMU DEV template, you lot'll enter the credentials you lot want to use for the administrator account. This stride is not needed if creating a site from one of your custom templates, as that admin user already exists in your template and volition be included automatically.
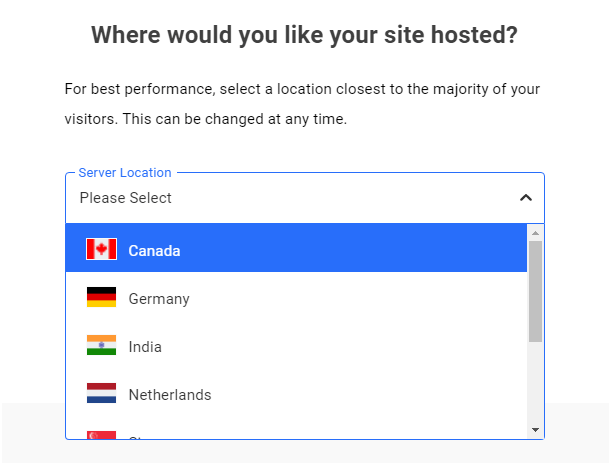
Finally, cull where you would like your site hosted. For best performance, select a location closest to the bulk of your visitors. Encounter the Locations & Regions chapter below for more info.
When ready, click the blue arrow to proceed and the site creation procedure volition begin.
Every bit a WPMU DEV member, y'all can likewise asking that nosotros manually drift your site in case the above option doesn't piece of work for you.
Much like the previous chapter, this is a guide on how to automatically create a new WPMU DEV hosted site, and submit a request for a transmission migration of your 3rd-party hosted site into it.
If y'all already accept a WPMU DEV hosted site that you desire to use as the destination site for your migration, you can use the Migrate Existing Site choice under the Hosting > Tools tab in your Hub instead.
Create a New WPMU DEV Site for Migration
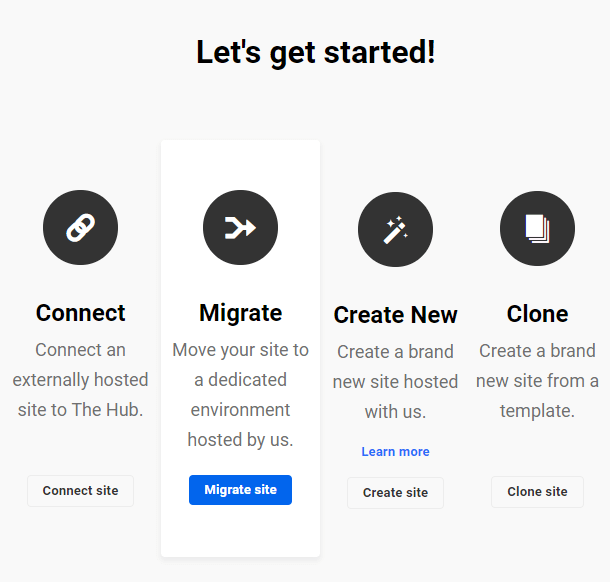
From the My Sites overview screen, click the + Add Site push at top-right to add a new site.

Then select the Migrate option.
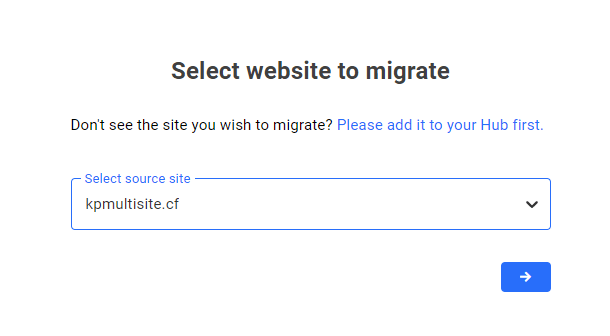
The dropdown menu on the next screen will reveal a listing of all the sites currently connected to The Hub. If the site you wish to migrate does not announced in the listing, so information technology is not connected, and you should click the Please add it to your Hub showtime link, and follow the instructions provided. Once the site is connected, select it from the dropdown menu and click the arrow to proceed.
Once the site is selected, click the arrow, then select the hosting program y'all want for the site you're migrating. And so click the arrow to keep.
You'll then be prompted to select the migration method you lot want to apply. To request a manual migration by our hosting support team, y'all'll desire to select the Assistance me migrate my site option and click the pointer to proceed.

On the side by side screen. enter your preferred temporary domain name in the field provided, and click the arrow to go along. Your new site will exist accessible at this temporary domain until you make DNS record changes for your desired custom domain name. Learn more about pointing a custom domain name to your site in our DNS documentation .

Select the geographic region where y'all wish your site to exist hosted.

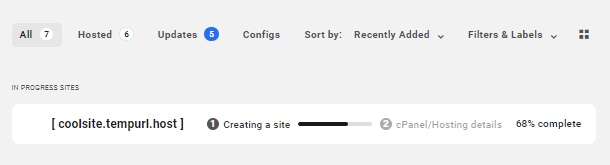
The migration tool will so proceed to create the hosted site that volition be used every bit the destination for your migration. This process only takes a few minutes.
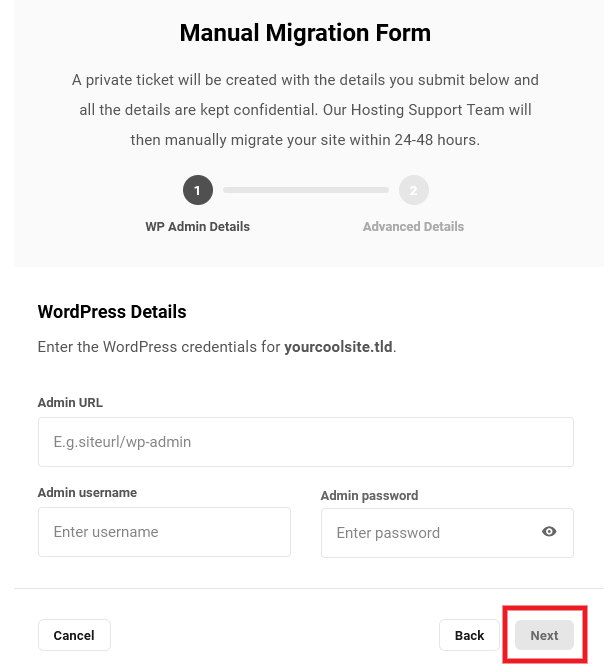
One time the site has been created, the screen will refresh and a modal window will pop open where you'll be prompted to provide access credentials for the site yous wish to migrate.
WordPress Details
Enter the required data and so the hosting support squad can admission your source site, then click the Next button:
- Admin URL – Enter the URL to the admin area of your site, without the protocol (http/https).
- Admin username – The username of an administrator user on that site.
- Admin password – The password for the above user.
On the side by side screen, you'll exist prompted to provide either login credentials to your Hosting control panel and/or (S)FTP/SSH details. The hosting support squad needs at to the lowest degree one of these to drift your site, merely if you tin provide both, that would be platonic. Select the appropriate option and enter the required information.

Host / Server Details
- Server / cPanel login URL – The URL needed to access the control console for your site at your tertiary-party host.
- Source Site hosting provider – The name of your current hosting provider.
- Host / cPanel username – The username you lot utilise to login to your site'south control panel.
- Host / cPanel password – The countersign for the above user.

FTP / SFTP / SSH Details
- Host – The hostname yous use to admission your site's file organization, for ex: ftp.mysite.com
- Port – The port used past your host's connexion protocol.
- Username – The username of a user that can access the root of the WordPress install.
- Countersign – The countersign for the in a higher place user.

Optionally provide any other information that may be needed to access the file arrangement of the site y'all want to drift. For example, if you have multiple sites installed in the same directory, provide the server path hither so our team knows which ane to migrate.
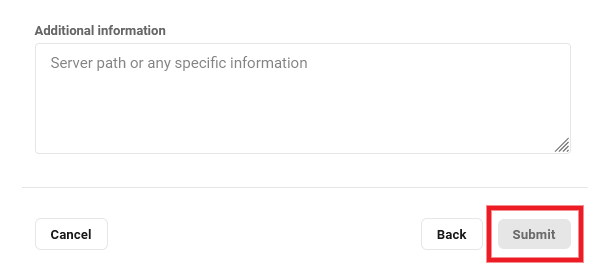
In one case you take provided all the required and whatsoever optional information in the form, click the Submit button to submit your asking.
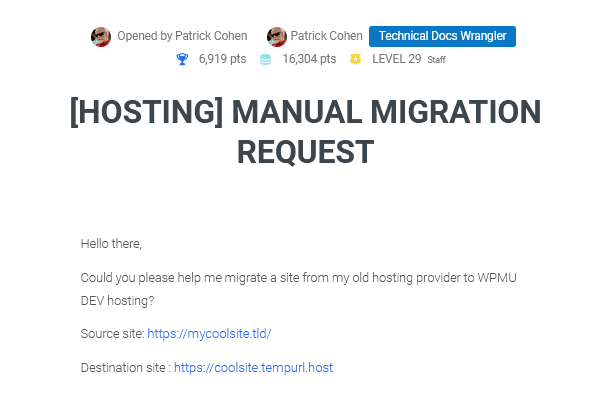
A confirmation discover volition appear on screen to inform you that your request has been successfully submitted.

The notice contains a link to the private support ticket that is automatically created for you in the Hosting Back up forum. All the data that you lot provided in the class is available only to the hosting support team in a individual task linked to that ticket.
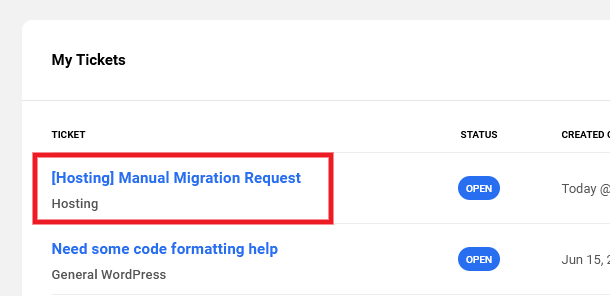
If the notice closes before you take a chance to click on the ticket link, you'll find it listed in the My Tickets section of the Support area in your Hub.
The hosting back up squad will be notified of your request and will proceed with the transmission migration of your site inside 24-48 hours. As soon as they reply on your ticket, with confirmation that the migration has been completed or if they require more than data, you'll receive an email notification of their reply.
That email will contain a link back to your ticket where you can reply if needed. Please do not reply directly in the e-mail itself.
Supported Migrations & Conversions
It'due south important to note that some types of migrations are out-of-scope and cannot be handled by our support or hosting staff. Following are the types of manual migrations/conversions that we can and cannot do for y'all.
- Supported migrations
- Yep – If Single site -> Single site
- Yeah – If Multisite -> Multisite
- Supported conversions
- Aye – If Unmarried site -> Multisite
- Aye – If Subsite -> Unmarried site (you should wait to need to perform some cleanup in the converted site, and at that place may be configuration issues for some plugins due to conversion)
- Depends – If Multisite -> Unmarried site (supported only if in that location's simply a primary site, without subsites)
- Depends – If Subdomain -> Subdirectory (supported only if there's just a main site, without subsites)
- Depends – If Subdirectory -> Subdomain (supported only if in that location'southward simply a main site, without subsites)
- Depends – Backups made using the All-in-Ane Migration plugin that creates archives using .wpress format should be avoided every bit we can't guarantee that we can fully extract them.
- Not supported – Out of scope
- No – If Single -> Subsite (3rd party developer required for this type of migration)
- No – If Subsite -> Subsite (3rd party developer required for this type of migration)
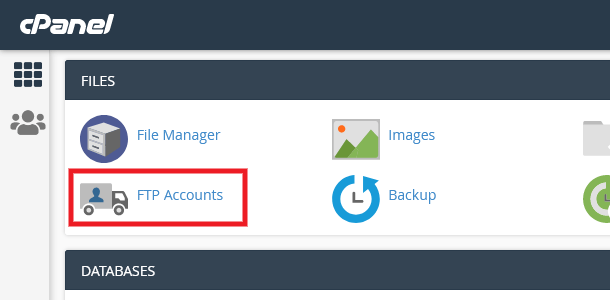
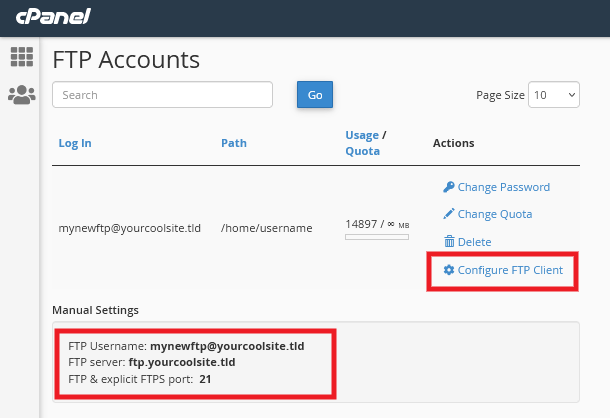
Follow this guide to get FTP credentials for any host that uses the popular cPanel interface.
Once logged into your cPanel, scroll downward to the Files section, and click on FTP Accounts.
If there is not already an FTP user available for which yous know the password, you tin can only create a new one for your migration.
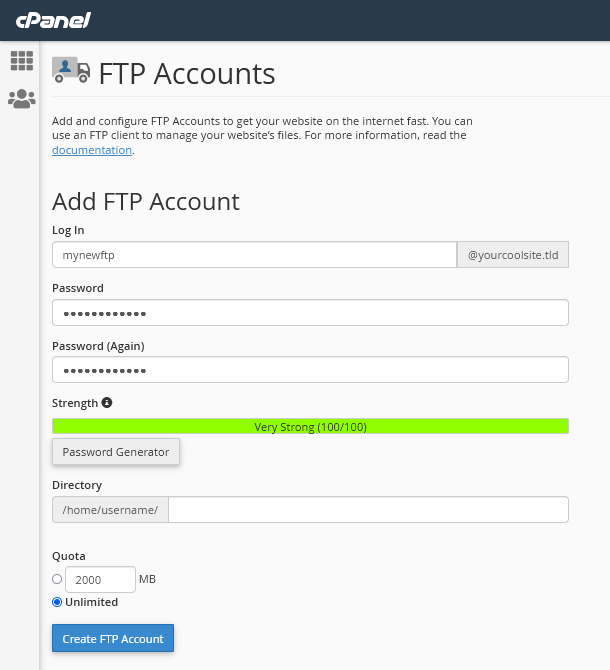
- Log In – Enter the username you desire for this FTP user
- Password – Enter the secure countersign you want to utilise for this FTP user. You'll desire to take note of your chosen password for subsequently apply equally it will not exist displayed in one case the account is created.
- Directory – IMPORTANT: Be sure to delete what the system adds in this field then the new user has total access to your site'south root directory.
- Quota – Should be set up to Unlimited.
Once you've entered all the information as above, click the Create FTP Account push button.
You lot'll then meet the new FTP account you just created in the FTP Accounts list but beneath the course you lot just submitted.
Click the Configure FTP Client link for the account you just created to pop open the Manual Settings department where you'll see the info yous demand.
If y'all are requesting a manual migration, y'all would provide the needed info every bit described in the Manual Migration by WPMU DEV Staff chapter above.
If y'all are migrating your site using the Migration Tool in your Hub , enter the FTP information in the Drift Existing Site modal window as follows:
- Select the SFTP or FTP option for the protocol according to the protocol used by your host.
- The FTP Server shown here is what you would enter for the Host.
- The Port should be set according to the protocol used by your host: 21 for plainly FTP, 22 for secure SFTP.
- Leave the WordPress install path blank (this is why you ensured the Directory was blank when you created the FTP business relationship as above).

Once all the FTP information has been added in the Drift Existing Site modal, click the Commencement Migration button. The time it takes to consummate will depend on the size of the site you're migrating.
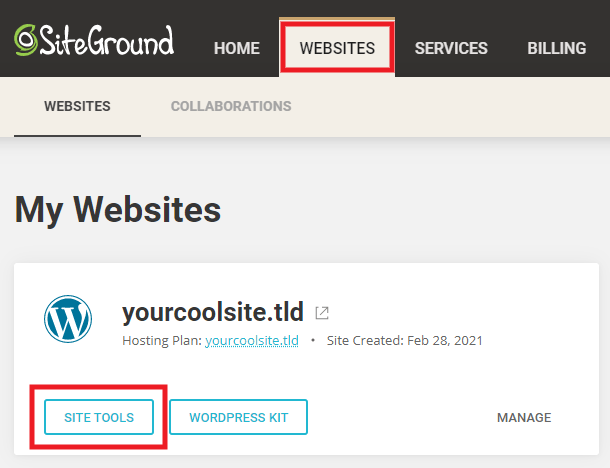
Follow this guide to become FTP credentials for your SiteGround hosted site.
Once logged into your SiteGround account, click the Websites link in the main navigation. Then click the Site Tools push button for the site you want to migrate.
In the sidebar on the next screen, click the FTP Accounts choice from the Site carte. If there is not already an FTP user bachelor there for which you know the password, you lot can simply create a new i for your migration.

- Business relationship Name – Enter the username y'all want for this FTP user
- Password – Enter the secure password you want to employ for this FTP user. You lot'll want to take annotation of your chosen password for later use every bit it volition not exist displayed in one case the business relationship is created.
Once yous've entered the information as to a higher place, click the Create push.
You'll then see the new FTP business relationship you only created in the Manage FTP Accounts list just beneath the form you merely submitted.
Click the vertical ellipsis icon to popular open management options for the FTP account.
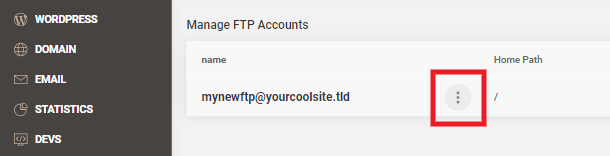
In the contextual bill of fare that slides open at the lesser of the screen, click the FTP Credentials option.

That volition popular open a fiddling modal window with the FTP Settings info you need.

If you are requesting a manual migration, you would provide the needed info as described in the Manual Migration by WPMU DEV Staff chapter above.
If you are migrating your site using the Migration Tool in your Hub , enter the FTP data in the Migrate Existing Site modal window equally follows:
- Select the SFTP or FTP selection for the protocol co-ordinate to the protocol used past your host.
- The Hostname shown hither is what you lot would enter for the Host.
- The Port should be set according to the protocol used by your host: 21 for apparently FTP, 22 for secure SFTP.
- Get out the WordPress install path bare and so the tool tin can connect to your WordPress root.
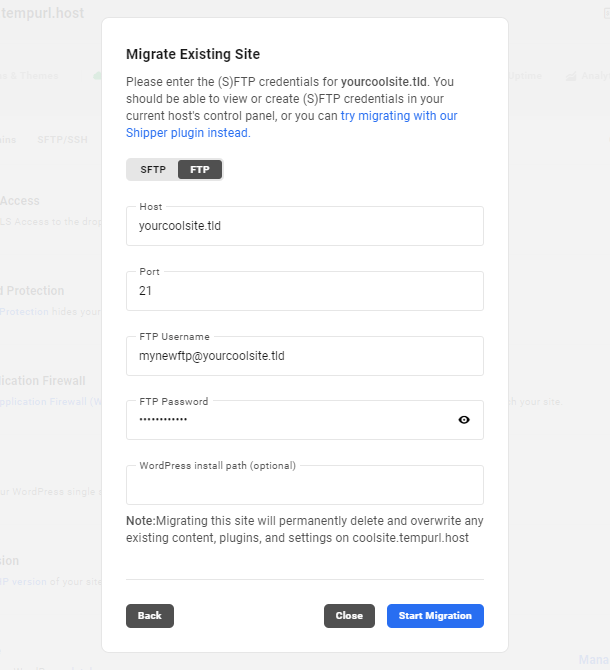
Once all the FTP information has been added in the Migrate Existing Site modal, click the Start Migration button. The time it takes to complete will depend on the size of the site you're migrating.
Follow this guide to go SFTP credentials for your WP Engine hosted site.
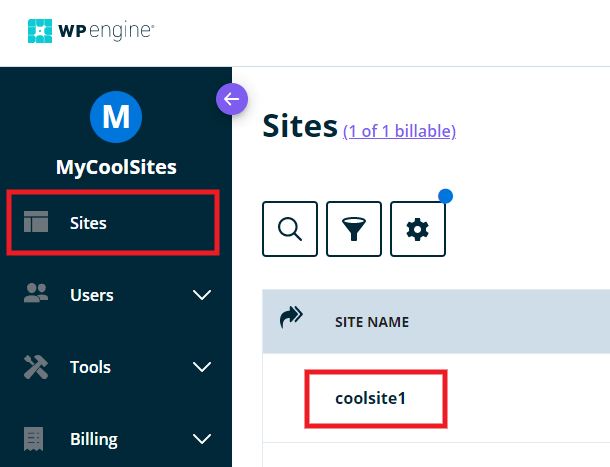
Once logged into your WP Engine business relationship, navigate to the Sites screen and click on the proper name of the site you lot desire to migrate.
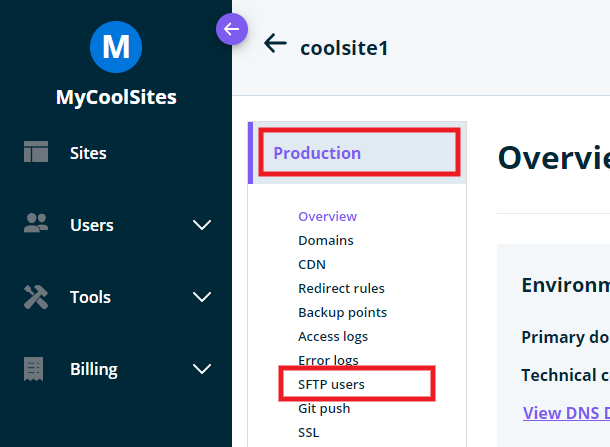
Next, in the Product bill of fare, click the SFTP users pick.
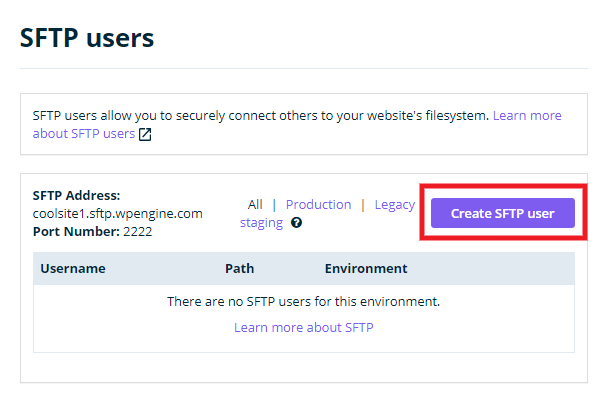
If in that location is not already an SFTP user available there for which you know the password, yous can simply create a new ane for your migration. In the SFTP users section, click the Create SFTP user button.
That volition pop open a modal window with the new SFTP user cosmos form.
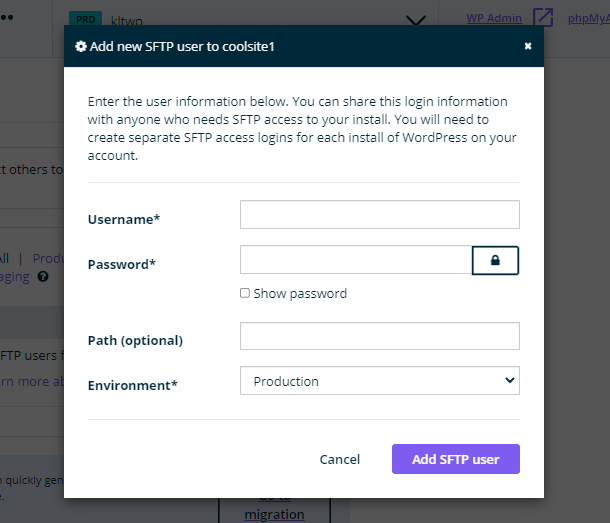
- Username – Enter the username you want for this SFTP user
- Password – Enter the secure countersign you desire to utilise for this SFTP user. You'll want to take note of your called password for later use as it will non be displayed once the business relationship is created.
- Path (optional) – Leave this blank.
- Environment – Be sure to select your Production surroundings to migrate your bodily site.
Once y'all've entered the information equally above, click the Add together SFTP user push button.
You'll and then run into the new FTP account yous merely created in the surface area below the Create SFTP user section where all the info you lot need is displayed.

If you are requesting a manual migration, you would provide the needed info as described in the Transmission Migration by WPMU DEV Staff chapter higher up.
If you are migrating your site using the Migration Tool in your Hub , enter the FTP information in the Migrate Existing Site modal window as follows:
- Select the SFTP selection for the protocol.
- The SFTP Address shown here is what you would enter for the Host.
- The Port should exist ready according to the protocol used past your host: Wp Engine uses port 2222.
- Leave the WordPress install path blank so the tool tin connect to your WordPress root.
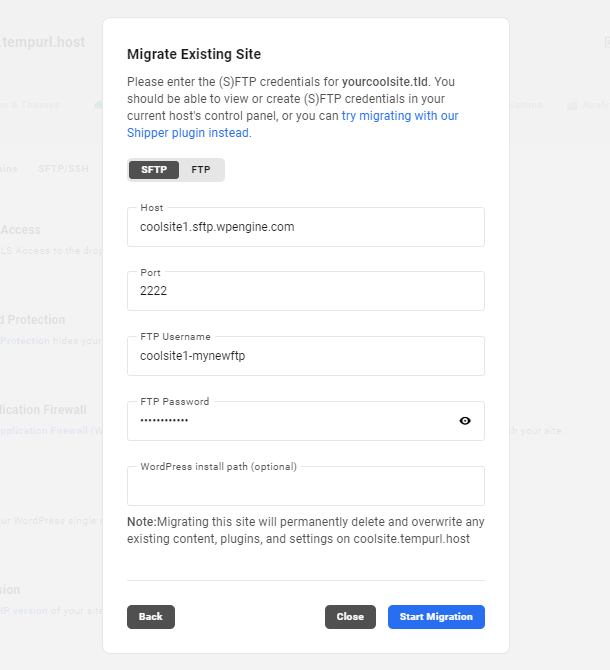
Once all the FTP data has been added in the Migrate Existing Site modal, click the Start Migration push button. The time information technology takes to consummate volition depend on the size of the site y'all're migrating.
Follow this guide to get SFTP credentials for your Cloudways hosted site.
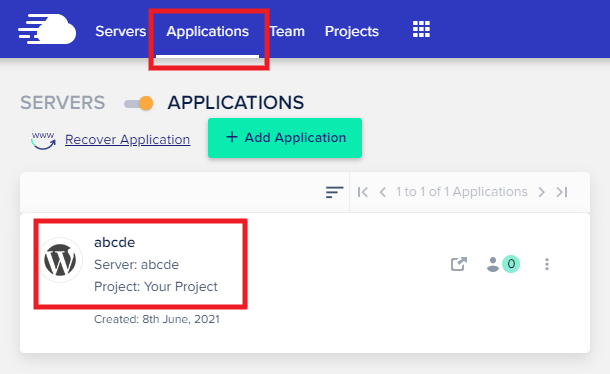
One time logged into your Cloudways business relationship, be sure you are viewing the Applications screen, non the Servers screen. Yous do not want to use an SFTP user for your entire server, equally using such a user would migrate everything on the server to WPMU DEV. Y'all simply desire to migrate 1 site.
On the Applications screen, click on the site (Application) that y'all want to drift.
If there is not already an SFTP user available for that site for which you know the countersign, you can simply create a new i for your migration.
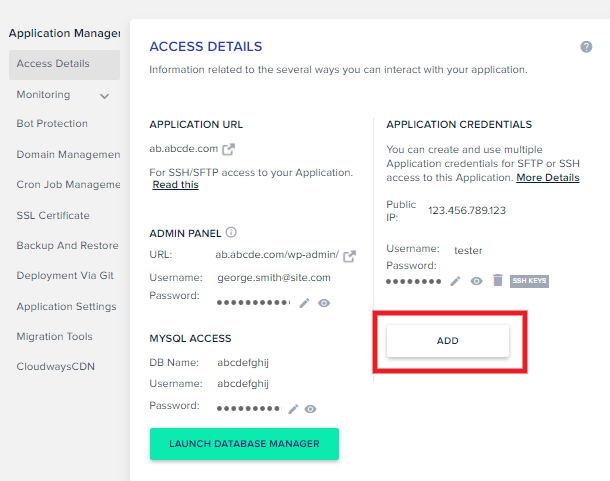
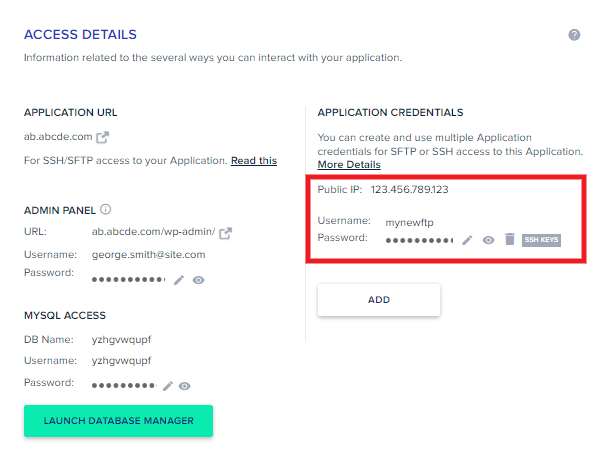
In the Access Details section of your Application, click the Add together push button under Application Credentials.
That will popular open up a modal window with the new SFTP user creation form.
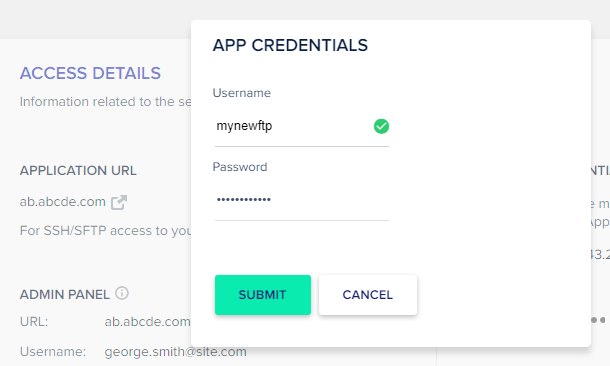
- Username – Enter the username you want for this SFTP user
- Password – Enter the secure password you lot want to employ for this SFTP user.
Once you lot've entered the information as above, click the Submit push.
Yous'll then see the new SFTP account you simply created in the Awarding Credentials area where all the info you need is displayed.
If yous are requesting a manual migration, you would provide the needed info every bit described in the Manual Migration by WPMU DEV Staff chapter above.
If y'all are migrating your site using the Migration Tool in your Hub , enter the FTP information in the Drift Existing Site modal window every bit follows:
- Select the SFTP option for the protocol.
- The Public IP shown here is what you lot would enter for the Host.
- The Port should be set according to the protocol used by your host: Cloudways uses port 22.
- The WordPress install path should be set to /public_html so the tool tin connect to your WordPress root.
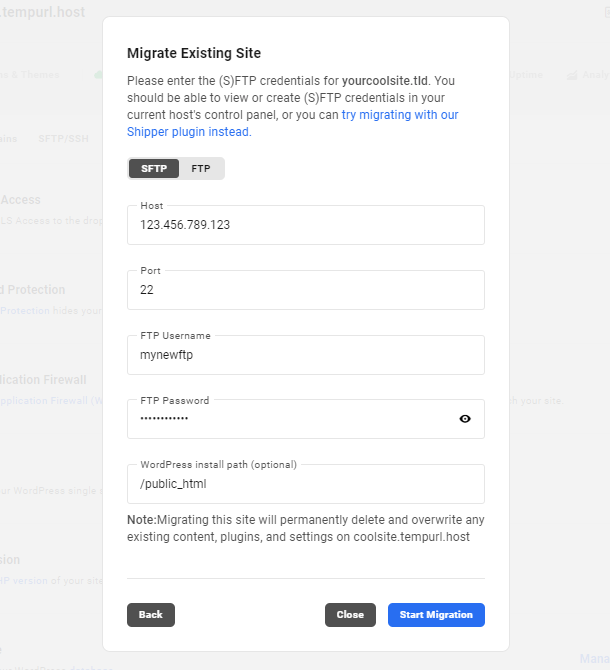
Once all the FTP data has been added in the Migrate Existing Site modal, click the Outset Migration button. The fourth dimension it takes to complete will depend on the size of the site y'all're migrating.
If y'all accept any hosting plan at GoDaddy that grants yous access to cPanel, follow the cPanel guide higher up instead.
Follow this guide to go SFTP credentials for your site hosted past GoDaddy Managed WordPress.
One time logged into your GoDaddy account, be certain y'all're on the My Products folio, and click the Manage button in the Managed WordPress department for the site you want to migrate.
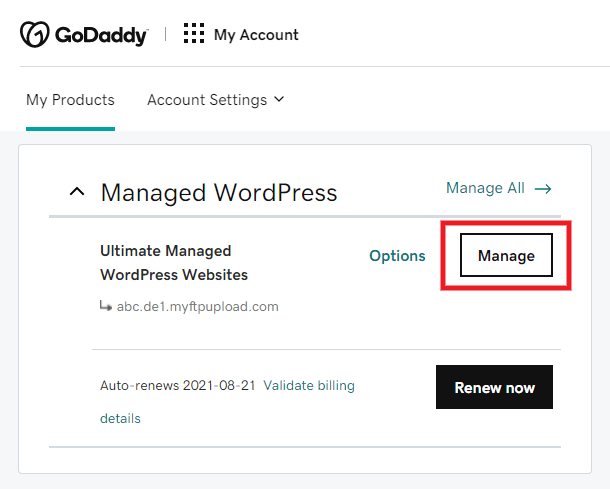
On the side by side screen, click the Overview button for the site.

In the site Overview area, navigate to the Settings screen and click the View link in the SFTP/SSH details row.

That will popular open a modal window with the SFTP Settings info you need.

If you are requesting a manual migration, you would provide the needed info as described in the Manual Migration by WPMU DEV Staff chapter higher up.
If you are migrating your site using the Migration Tool in your Hub , enter the FTP data in the Drift Existing Site modal window as follows:
- Select the SFTP option for the protocol.
- The Hostname shown here is what y'all would enter for the Host.
- The Port should be set up according to the protocol used by your host: GoDaddy Managed WordPress uses port 22.
- Go out the WordPress install path blank then the tool can connect to your WordPress root.

Once all the FTP information has been added in the Drift Existing Site modal, click the Commencement Migration button. The time it takes to complete volition depend on the size of the site y'all're migrating.
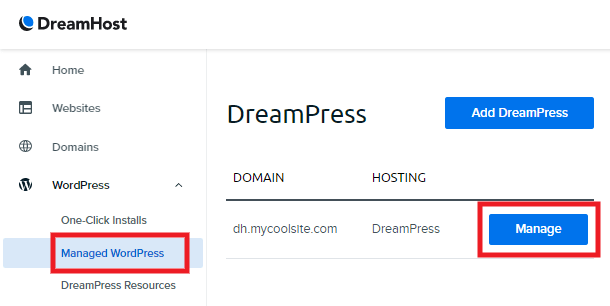
Follow this guide to get FTP credentials for your DreamHost DreamPress hosted site.
In one case logged into your DreamHost account, click the Managed WordPress option in the WordPress menu in the sidebar. Then click the Manage button for the site you desire to migrate.
On the next screen, gyre down to the Manage Files section and toggle on the Show Credentials selection. That will reveal the SFTP Settings info you need.

Unfortunately, information technology appears DreamHost does non brandish your WordPress install path anywhere in the control panel. And so you'll likewise want to click on the Manage Files button there to popular open their File Manager utility where you tin go that info.
Once in the File Director, be sure to navigate to the correct directory where your WordPress site is installed; information technology's the directory that contains the wp-admin folder. So copy the path that is displayed at the top of that screen.

If you are requesting a transmission migration, you would provide the needed info as described in the Manual Migration by WPMU DEV Staff chapter above.
If you lot are migrating your site using the Migration Tool in your Hub , enter the FTP information in the Migrate Existing Site modal window as follows:
- Select the SFTP selection for the protocol.
- The Host shown here is what yous would enter for the Host.
- The Port should be gear up according to the protocol used by your host: DreamHost Managed WordPress uses port 22.
- Enter the WordPress install path that you copied to a higher place so the tool can connect to your WordPress root.

Once all the FTP information has been added in the Drift Existing Site modal, click the Kickoff Migration push button. The time information technology takes to complete will depend on the size of the site yous're migrating.
Follow this guide to become SFTP credentials for your Flywheel hosted site.
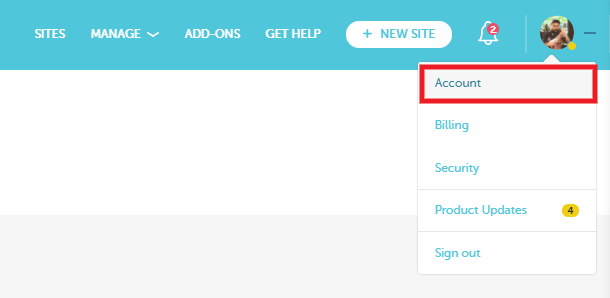
Once logged into your Flywheel account, click the Business relationship option in your profile menu at the top-correct of the screen.
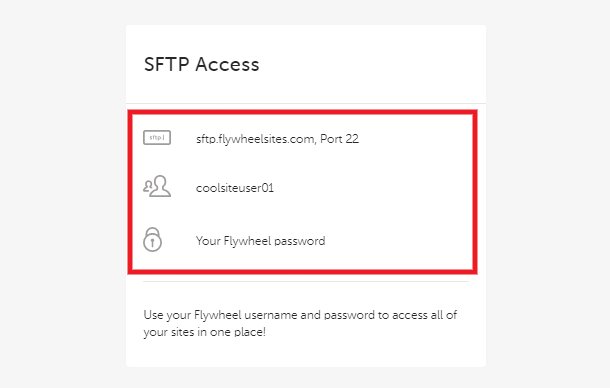
You'll and then see the SFTP info you need displayed in the SFTP Access department on that screen.
Unfortunately, information technology appears Flywheel does not display the WordPress install path for your site anywhere in their control console. There are 2 ways to get that needed info though:
- Employ the SFTP Access info every bit in a higher place in your preferred FTP Client to admission your site files. Once y'all accept navigated into the directory where your WordPress site is installed, you'll run across the install path displayed in the client. For example, this is what you might see in Filezilla where the path is indicated at the acme where it says Remote Site:

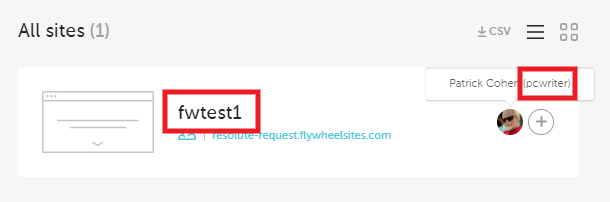
- Alternatively, you tin know what the install path is simply by combining your Flywheel username with the proper name of your site every bit it appears on the Sites screen. For case, if your username is pcwriter and your site proper noun is fwtest1, then the install path would exist: /pcwriter/fwtest1
If you are requesting a manual migration, you lot would provide the needed info as described in the Manual Migration by WPMU DEV Staff chapter above.
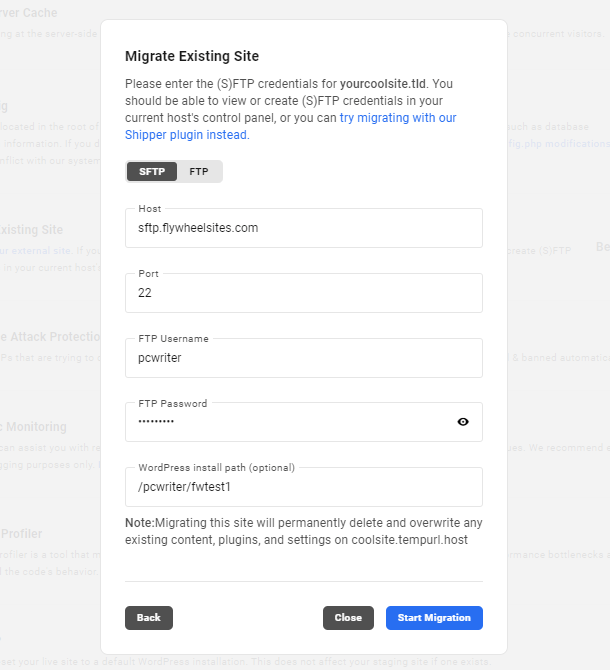
If you lot are migrating your site using the Migration Tool in your Hub , enter the FTP information in the Drift Existing Site modal window equally follows:
- Select the SFTP option for the protocol.
- Flywheel uses the same hostname for all sites, so enter sftp.flywheelsites.com for the Host.
- The Port should exist set according to the protocol used by your host: Flywheel uses port 22.
- Enter the WordPress install path every bit higher up so the tool can connect to your WordPress root.
Once all the FTP information has been added in the Migrate Existing Site modal, click the Beginning Migration push. The time it takes to complete will depend on the size of the site you lot're migrating.
If you lot have already SFTP'd into your site's files, you may have noticed that the file structure of Flywheel hosted sites is rather unique in that the wp-admin folder, and many root files, announced to be missing. Our smart migration tool volition notice that the site is hosted at Flywheel and will migrate the wp-content directory and the database, then install all missing files/folders from wordpress.org and then your site will role as it should.
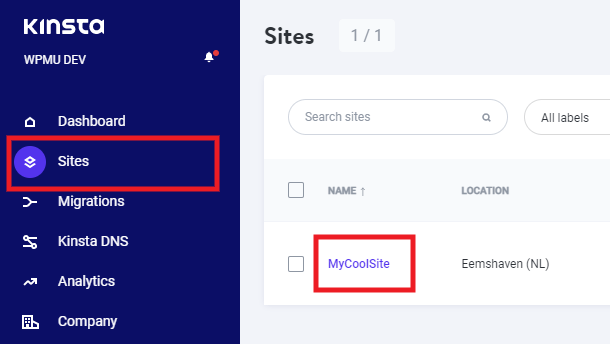
Follow this guide to get SFTP credentials for your Kinsta hosted site.
Kinsta automatically creates an SFTP account for each domain y'all add to your hosting program.
Once logged into your Kinsta business relationship, navigate to the Sites screen, and click on the site you want to migrate.
On the next screen, in the Info section for your Alive environment, curlicue down to the SFTP/SSH surface area where y'all'll discover the SFTP info yous need.
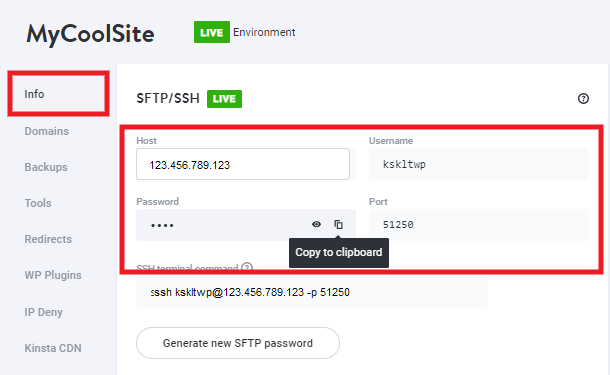
You'll too want to take note of the Path shown in the Basic details surface area at the peak of this same screen. This indicates the directory in which your WordPress site is installed.

If you lot are requesting a manual migration, you would provide the needed info as described in the Transmission Migration by WPMU DEV Staff chapter to a higher place.
If you are migrating your site using the Migration Tool in your Hub , enter the FTP information in the Migrate Existing Site modal window as follows:
- Select the SFTP option for the protocol.
- The IP accost shown in your Kinsta account for the Host is what you would enter for the Host.
- The Port should exist set according to the protocol used by your host. Kinsta assigns unlike ports for different users, then it is of import to copy the exact port shown in your account for your site.
- Enter the Path you copied above for the WordPress install path so the tool can connect to your WordPress root.

In one case all the FTP information has been added in the Migrate Existing Site modal, click the Start Migration push button. The time it takes to complete volition depend on the size of the site you lot're migrating.
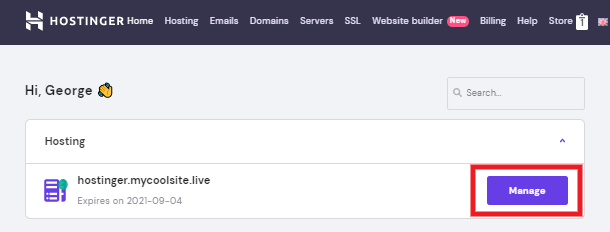
Follow this guide to get FTP credentials for your Hostinger hosted site.
Once logged into your Hostinger account, click the Manage push for the site you want to migrate.
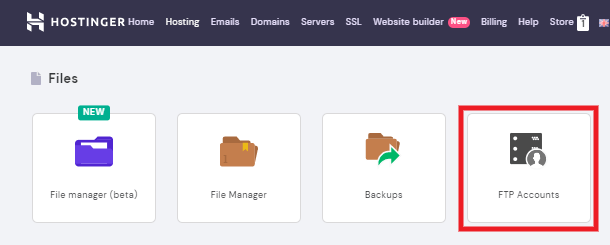
On the Hosting Account screen, curlicue downwards to the Files section, and click on FTP Accounts.
If there is not already an FTP user available for which you know the password, you lot can simply create a new 1 for your migration.

- Directory – This should be kept at the default so this FTP account can access the root directory for this site: /public_html
- Username – Enter the username you desire for this FTP user.
- Countersign – Enter the secure password you want to employ for this FTP user. Y'all'll want to take note of your called password for later employ as it will non exist displayed once the account is created.
Once you've entered all the information as higher up, click the Create button.
Y'all'll then see the new FTP account yous merely created in the List of Active FTP Accounts section simply beneath the form you just submitted.

If you are requesting a transmission migration, you would provide the needed info as described in the Manual Migration past WPMU DEV Staff chapter to a higher place.
If you are migrating your site using the Migration Tool in your Hub , enter the FTP information in the Migrate Existing Site modal window as follows:
- Select the FTP choice for the protocol.
- The Hostname as shown here is what yous would enter for the Host (exist sure to remove the ftp:// part if you lot correct-click and copy the link from that screen).
- The Port should be prepare according to the protocol used past your host: Hostinger uses port 21.
- Enter /public_html for the WordPress install path so the tool can connect to the root directory of your WordPress site.
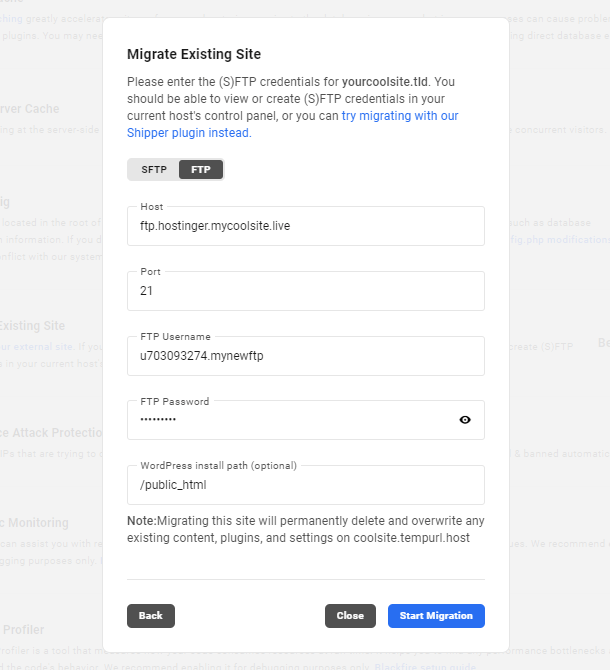
Once all the FTP information has been added in the Migrate Existing Site modal, click the Commencement Migration button. The time it takes to consummate volition depend on the size of the site you're migrating.
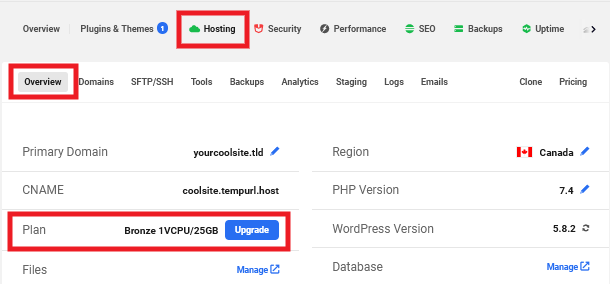
Equally noted above, you are gratuitous to upgrade or downgrade the hosting plan of any site at whatever fourth dimension you demand.
To become started, click the Hosting tab of your site in your Hub. Then, on the Overview screen, click the Upgrade/Downgrade or Resize push button that appears in the Programme row.
That will pop open up a modal window where you'll meet all the different plans to which you can upgrade or downgrade your site.
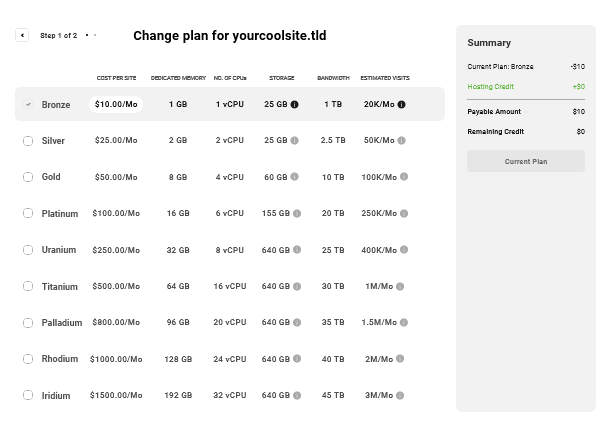
In that location are no restrictions on upgrading the hosting plan of any site. However, due to server architecture and disk sizes, downgrading does have some limitations.
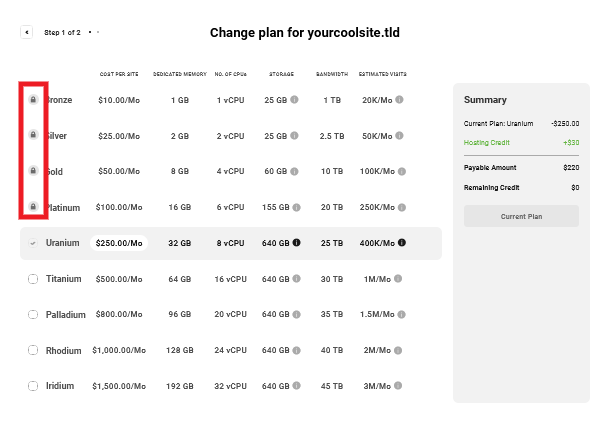
The list of plans in the modal as illustrated above will adapt according to your current hosting plan, and only those to which you can downgrade will be available for selection. Any plans that you cannot downgrade to volition be locked and cannot be selected.
Downgrading Limitations
Our four original hosting plans – Bronze, Silver, Gold & Platinum – each have different disk sizes. So it is possible to automatically downgrade but ane level from whatever of these plans.
Downgrading more than one level on any of these plans requires a DNS modify that only y'all can accomplish manually. So if you do demand to downgrade more than ane level on whatsoever of these plans, we propose that yous contact our back up superheroes to asking a downgrade. Our hosting support team will get a new hosting environment created for you at the desired plan and manually migrate the site's files and content over. The only thing left for you to practise would exist to add together your domain name to the new site in your Hub and suit its DNS entries so it points there.
Our 5 new bigger plans – Uranium, Titanium, Palladium, Rhodium & Iridium – all accept the same disk size, and then they are scalable and upgrading and downgrading to & from any 1 of these at whatever fourth dimension is possible .
However, it is not possible to downgrade from one of the higher-tier plans to 1 of the iv original lower plans.
To help illustrate these restrictions, hither are a few examples:
- Example 1 – Let's say you've had a site on the Uranium plan for some time and anticipate needing some extra ability for a blowout Black Friday sale. You can upgrade to Iridium for a few days to handle that spike in traffic, then downgrade once again when things get back to normal.
- Example 2 – Y'all currently have a successful site with lots of traffic on the Gold plan, and want to upgrade, but think Platinum might not be quite plenty. You can upgrade to whatsoever of the other higher-tier plans at whatever time.
- Example 3 – You currently have a site on the Platinum plan, but don't actually need all those resources. You can only downgrade i level (so to the Gilt programme in this case) unless you request a manual migration as noted above. Note that in one case a program has been downgraded one level on these older plans, information technology cannot be downgraded or migrated to another lower level.
- Example 4 – Y'all currently have a site on the Palladium program. You could downgrade to either Titanium or Uranium, just you lot cannot downgrade to any of the four original lower-tier plans. Yet, our hosting support team could perform a manual migration for you in this case likewise, as noted to a higher place.
Of class, for all upgrades and downgrades, nosotros would pro charge per unit you the price difference for an upgrade and, when downgrading, we'd pro charge per unit yous credits for the time you lot didn't use on the higher program.
Multisite admins tin can adjust both the file size and file blazon limits in their Network Settings, located hither: Dashboard > Network Admin > Settings > Network Settings.

Gyre down to the Upload Settings section, where y'all will find the Upload file type and Max Upload File Size fields.
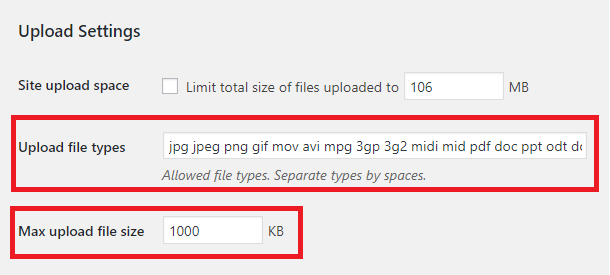
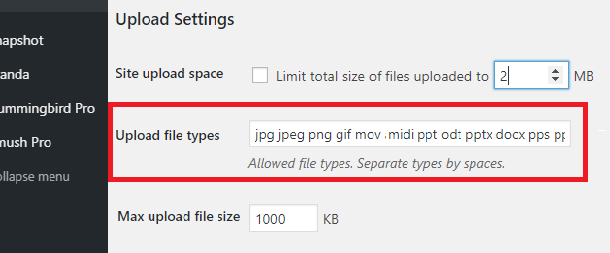
Adding/Removing File Types in Multisite
In the Upload file types field, enter the file extensions of the file types you want to add, separating the extensions with a single space. Delete the extensions of file types you do not want to be uploaded.
Modifying the File Size Upload Limit in Multisite
In the Max Upload File Size field, enter a size, in kilobytes, up to 12800kb (128mb) to gear up the max size for files uploaded to this network.
Click Salve Changes, and that'southward all there is to information technology. The new file size limit will apply to every site within this network.
You can accept white labeling to another level by customizing the server error pages with your brand, or any custom information you may want.
And so, for instance, if y'all're not likewise enthusiastic about our default error 500 page:
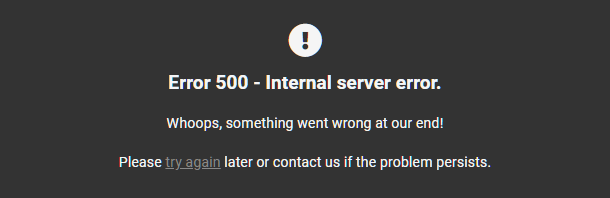
You could create something much more suited to your make:
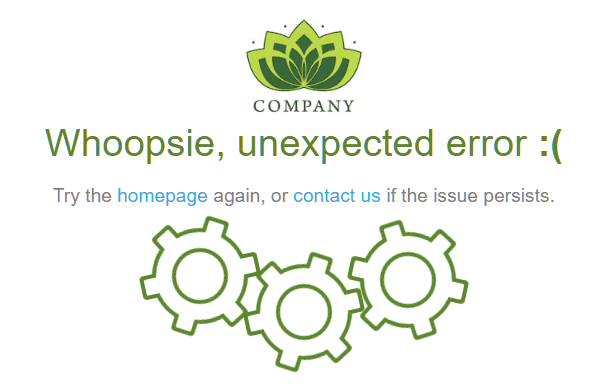
How to customize
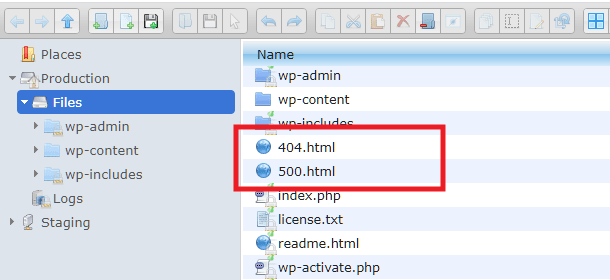
To create a custom page for whatsoever of the higher up errors, create a .html file with the error number as the filename, with any content yous wish within. And so upload it to the root of your WordPress install.
For example, to create a custom fault page in the unlikely case something goes incorrect on your server and you become the dreaded "500 internal server mistake", you'd create a file called 500.html
Add any custom HTML content you like to your file, and upload. You can utilize the Manage Files utility from your Hub > Tools screen to create and add content to the file, or edit on your computer and upload via the File Manager or FTP.
Here's an case of the bones HTML you'd want to have in any custom error folio:
Your custom pages can be equally simple or as creative as yous similar, and branded withal you need. If yous need some inspiration, have a await at these pages for some great examples:
https://uicookies.com/500-error-page-templates/
https://freefrontend.com/html-css-404-folio-templates/
Source: https://wpmudev.com/docs/hosting/overview/
0 Response to "I Just Uploaded My Ssl to Bluehost. When Will It Show as Secure?"
Post a Comment